-
Created by
 Stryker Ai about an hour ago
15 minute read
Overview
Worldgroup communicates with its users in either of two distinct ways:
Terminal mode, the traditional centralized processing approach, andClient/server mode, the newer distributed processing approach. Server Developer’s Guide describes the development environment for Worldgroup. It explains the internal workings of the Worldgroup server and the terminal-mode user interface. You should read this guide first.
Client App Developer’s Guide describes how to create Visual Basic applications which run under Worldgroup Manager, the client side of C/S mode. Agent Developer’s Guide describes how to create the server side of C/S mode: agents. Finally, GSBL Guide describes low-level communications functions.
The ideal design for a Worldgroup application provides a separate front end for each of the two interface modes. The core application code is then accessed through a common API:
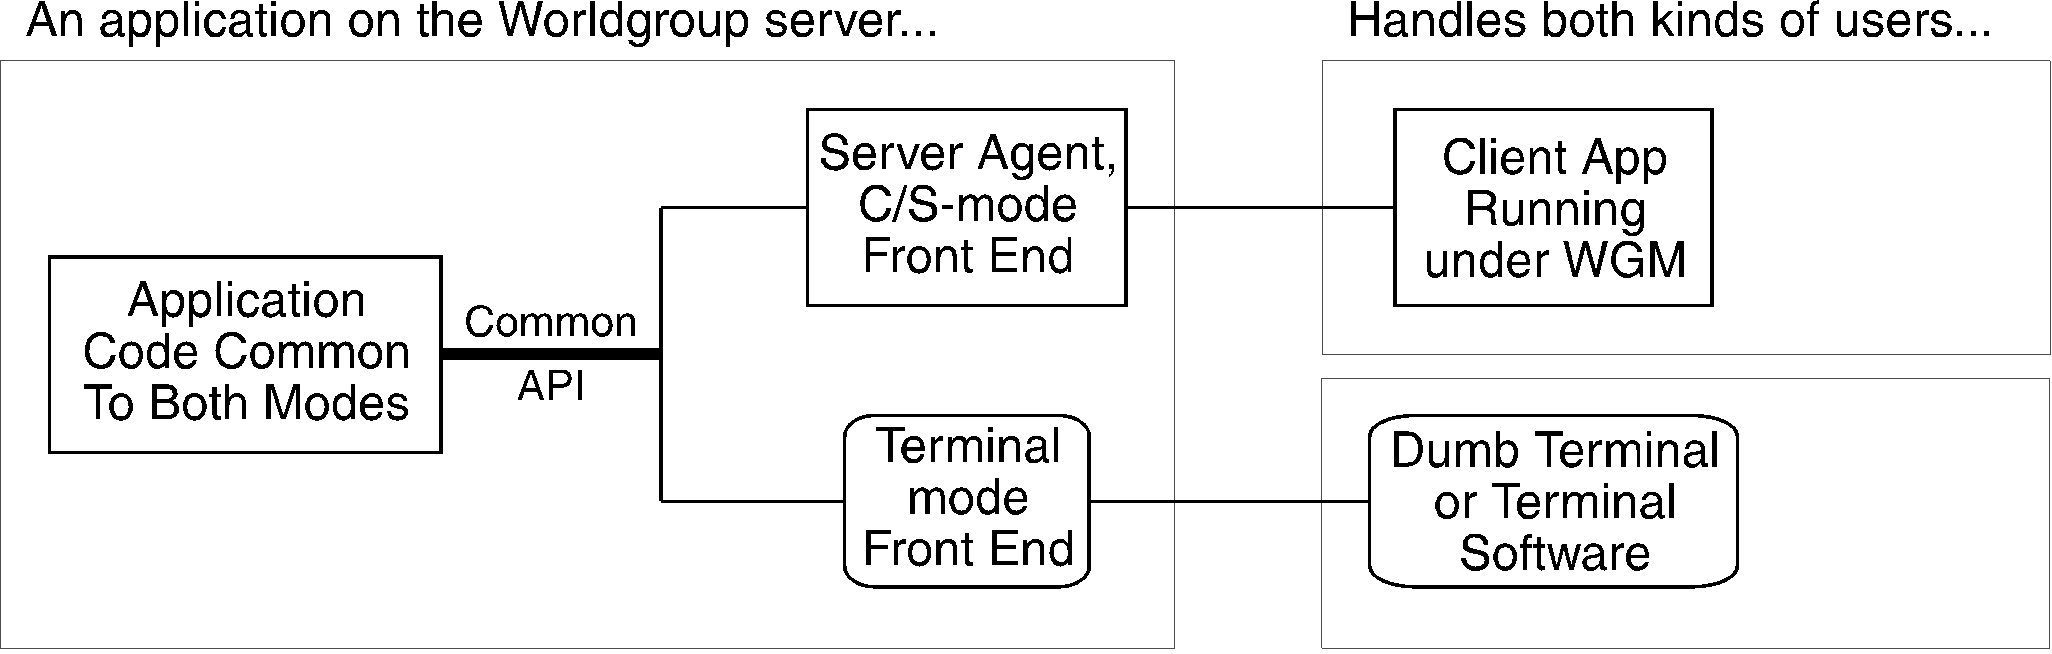
If you’re writing an application from scratch, or thoroughly overhauling an existing application, this is the recommended design. For example, Worldgroup’s messaging system (E-mail and Forums) has been completely overhauled as compared to its predecessor in The Major BBS. The new messaging system follows this design.
In some cases, though, there is almost no code common to both modes. This occurs in applications like Registry, Account Display/Edit, and Sign-up, none of which perform much data processing but instead focus almost entirely on I/O. Instead of creating a token common area with a common API, this approach is often more efficient:
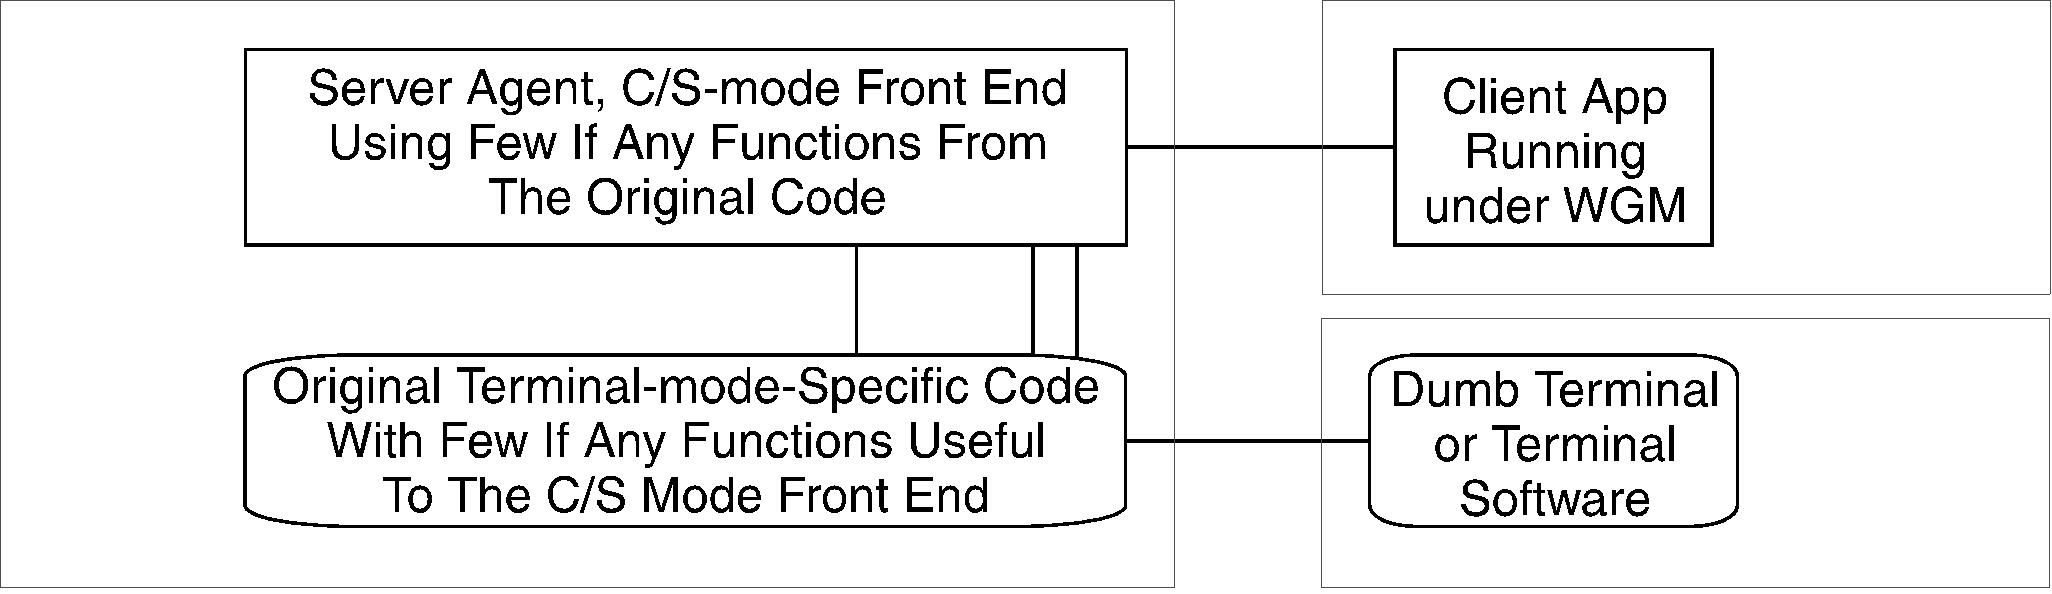
From a user’s viewpoint, none of this is apparent. The server code is a black box with two alternative points of access: either a terminal-mode user interface, or a C/S-mode application interface expecting to communicate with a client app running under WGM on the user’s PC.
Requirements
On the server side of your development environment, you need:
a 386, 486, or Pentium with at least 4 meg RAMa minimum of 100 meg available disk space, but you may want much moreDOS version 5 or higherWorldgroupThe Client/Server Developer’s Kit for Worldgroup, which includes:
C source code for Worldgroup
supporting subroutine libraries
supporting batch, make, and other filesBorland C++ compiler version 4.50 (compatibility kits for other versions may be available from Galacticomm) Microsoft Windows 3.1 or later (in order to install Borland C++ v4.50)Phar Lap 286|DOS-Extender SDK A text editor of your choiceIf you need to create new databases for your application, you will need to purchase Btrieve directly from Btrieve Technologies, Inc.
Server Developer’s Guide assumes:
You have purchased Worldgroup and the Client/Server Developer’s Kit.You have read Sysop’s Guide for Worldgroup. You are proficient in using Worldgroup via modem or other interface. You are proficient in managing Worldgroup from the Main Console. You are proficient in the C language. You are proficient at using DOS and IBM-compatible PCs. Knowing assembly language can be helpful too, but it’s by no means required to make extensive use of this development environment.
See Client App Developer’s Guide for client-side requirements.
You Can Modify Worldgroup in Stages
Changes made to Worldgroup fall into either of two broad categories:
Customizing Custom tailoring the functionality of one specific Worldgroup
Developing Programming an Add-on Option for Worldgroup
The main purpose of Server Developer’s Guide is to help developers create new products for Worldgroup, but it will also be helpful if you’re running a Worldgroup and wish to customize it by making changes or additions to the source code. From simple cosmetic changes to the authoring of new applications, Worldgroup is as flexible as you require.
With Only The Baseline Package
You can customize the values of several thousand CNF options. These allow you to steer each baseline module through a set of pre-defined courses: charging for messages sent vs. not charging, requiring keys for various activities, even fine-tuning the frequency of various events.
More importantly, the Text Block type of CNF option allows you to customize completely the language of the text presented to terminal-mode users (and some of the text presented to C/S-mode users).
Basic Utilities let you manage data files and do other tasks offline.
Menu Tree page settings allow you to change how the facilities of your Worldgroup are presented to your users. You can control both the layout and the appearance of your system here.
With The Client App Developer’s Kit
You can change the language text hardcoded into client apps, both the prompt-type text in .EXE files and the text of help topics in .HLP files.
You can customize a client app’s appearance without changing its logic. If you prefer vertical toolbars but wish each button to retain its original function, for example, you can do it. You can change a client app’s logic without changing its server agent’s logic.
Client App Developer’s Guide focuses on these issues, directing you through the Visual Basic programming environment.
With The Client/Server Developer’s Kit
You can change an existing server agent’s logic, the way it interprets and responds to requests from the client app on the user’s PC. This gives you complete control over an existing application, on both sides of the communications channel.
While you’re changing the way it responds to C/S-mode requests, you can change the way it handles data internally and how it handles users connecting in terminal mode.
You can also create the server side of completely new applications. Finally, you can change the Worldgroup server baseline software itself: the Main Console, etc.
Server Developer’s Guide focuses on the server side of applications, particularly the internal processing and terminal-mode interface areas. Agent Developer’s Guide focuses on the C/S-mode front end issues. GSBL Guide describes the communications-level functions of the optimized machine-code engine at the heart of Worldgroup.
With The Extended C Source Developer’s Kit
You can change almost everything else in the Worldgroup environment: the CNF program itself, WGSDRAW, the Menu Tree design program, etc.
Either Way, You Need a Developer-ID
*excluding INSTALL.EXE, DISK1.DID, DISK2.DID, etc.
All files* you supply to your customers, and all files created by your product(s), should have names unique to you. To ensure this, register a unique three-character Developer-ID with Galacticomm and use it as the first three characters of each filename you create. For example, we often use GAL and GCS (hence GALFL100.EXE and GCSVCMAN.EXE).
This applies whether you are customizing or developing: any client apps you create will be distributed to all users who contact your system via Worldgroup Manager. It is extremely important that the filenames you choose not conflict with filenames chosen by other developers.
Other naming conflicts can occur in:
Text variable names (see page 102)CNF options and levels (see page 79)Statistics screen names (see page 276)Source filenames should also use the Developer-ID prefix to avoid name collision. Even if you use a separate directory for your source files, your object files will reside in the same directory as all other object files from all other developers. The need for unique source and object filenames is not as strict as the need for unique names of files associated with running Worldgroup and Add-on Options, however.
While it would be a disaster for a Sysop to buy two Add-on Options from different sources and have them not work because of a filename collision, it would be merely an annoyance for someone who buys your source code to run into name collisions. The latter is going to happen to a far smaller group of people (Worldgroup developers and customizers), and those people are more likely to be able to recover from it themselves by manually renaming some of the files.
Registering Your Developer-ID
Galacticomm maintains a master list of Developer-IDs to help Worldgroup developers avoid choosing one which is already in use. To register your Developer-ID with us, call (305) 583-5990 and ask for the ISV Program Manager. In this manual we’ll use DDD to represent an example of a Developer-ID.
Installation
The following procedure has been designed to apply to everyone who purchases C source code from Galacticomm. It assumes you already have a way to edit text files like .BAT files.
Several products are discussed here, and several sections may not apply to you. Whether you’re building a development environment for a baseline-only Worldgroup, or for a large-scale system with dozens of Add-on Options, including some of your own, please use this as your central reference, and follow the steps very carefully.
To create a development environment for Worldgroup on your computer:
1. If you haven’t already installed Worldgroup’s baseline, put the first disk in A: and type: A:INSTALL enter
All documentation assumes you use the default directory \WGSERV for your development environment, although you can install Worldgroup elsewhere if necessary. The directory will be created automatically for you if it does not already exist.
You can install from B:INSTALL enter, or even Q:INSTALL enter, as your hardware configuration requires. This will be true for installing software from any disks from Galacticomm, even though we’ll assume A: in examples.
Before you install the source code and other items, it’s a good idea to bring Worldgroup online and become familiar with it. See Sysop’s Guide.
2. Install the Borland C++ 4.50 Compiler according to its directions. All documentation assumes you use the default directory \BC45. The directory will be created automatically for you if it does not exist already.
- Put the Phar Lap 286|DOS-Extender SDK Software Development Kit disk 1 in A: and type: A:INSTALL enter
All documentation assumes you use the default directory \RUN286. The directory will be created automatically for you if it does not exist already. When it comes time to choose what to install, pick these:
286|DOS Extender Binaries YES
MS C Support NO
MS Fortran Support NO
Borland C++ Support YES <—— automatically creates
MS C Examples NO \RUN286\BC4
Borland C++ Examples NO
4. In order to compile or link software on the server, you’ll need to have the following environment variables set:
MBBS to the path your Worldgroup server is installed in;
BORLAND to the path your Borland C++ is installed in; and
PHARLAP to the path your Phar Lap 286 is installed in.
Also, put the compiler BIN directory, the DOS-Extender BIN directory, and the Worldgroup SRC directory in your PATH statement.
For example, you could have something like this in your AUTOEXEC.BAT file:
:
SET BORLAND=C:\BC45
SET PHARLAP=C:\RUN286
SET MBBS=C:\WGSERV
:
PATH=C:\DOS;%BORLAND%\BIN;%PHARLAP%\BIN;%MBBS%\SRC
:
Because you’ve changed AUTOEXEC.BAT, reboot your PC before continuing.
Next, create a TLINK.CFG file and a TURBOC.CFG file in your \BC45\BIN directory (or replace them if already there) with something like this:
Notice that you cannot use the environment variables here, but must use the literal path names instead, all the more reason to install software in the default locations.
TLINK.CFG
-L\BC45\LIB;\RUN286\BC4\LIB;\WGSERV\DLIBTURBOC.CFG
-I\BC45\INCLUDE;\RUN286\INC;\WGSERV\SRC
-L\BC45\LIB;\RUN286\BC4\LIB;\WGSERV\DLIB- Get and install Borland C++ 4.50 Huge Model Support. Dial (617) 661-1009 and log onto Phar Lap’s BBS. Go into File Libraries, select library GALACT, and download the file named PLPAT4.ZIP into your \RUN286\BC4\LIB directory, then unzip it and install it:
CD \RUN286\BC4\LIB
\WGSERV\PKUNZIP PLPAT4.ZIP
MKLIB H \BC45\LIB
Pay no attention to any file not found announcement by MKLIB.
6. Install the Worldgroup Client/Server Developer’s Kit. Put the first disk in your A: floppy drive and type: A:INSTALL enter
Only if you have the Extended C Source Developer’s Kit, do steps 7 and 8:
7. Put the first disk of the Worldgroup Extended C Source Developer’s Kit in A: and type A:INSTALL enter
8. The master make file MAKEBBS.BAT and the master debugging make file MAKEBBSD.BAT are both located in the SRC directory beneath the Worldgroup server main directory (\WGSERV\SRC). Both files contain instruction pairs for each part of your project. The first line in each pair is a CD to this directory, referred to using an environment variable (%MBBS%\SRC), and the second line is the MAKE command for one of the .MAK files. The next-to-the-last line in each batch file is a CD to the %MBBS% directory (\WGSERV), and the last line is the batch label :DONE to mark the end of the file.
For every %MBBS%\SRC\.MAK file that comes with the Extended C Source Developer’s Kit, you need to insert another instruction pair in MAKEBBS.BAT ahead of the last two lines of each file:
cd %MBBS%\src           <-- add verbatim for each additional *.MAK file
MAKE -fwgsxyz.mak               <-- add for each additional *.MAK file, e.g. WGSXYZ.MAK
cd %MBBS%                       <-- leave as next-to-the-last line of each batch file
:DONE                   <-- leave as last line of each batch file
For every %MBBS%\SRC\.MAK file that comes with the Extended C Source Developer’s Kit, you need to insert a debugging version of this same instruction pair in MAKEBBSD.BAT ahead of the last two lines of each file:
cd %MBBS%\src            <-- add verbatim for each additional *.MAK file
MAKE -DDEBUG -fwgsxyz.mak <-- add for each additional *.MAK file, e.g. WGSXYZ.MAK
cd %MBBS%                        <-- leave as next-to-the-last line of each batch file
:DONE                    <-- leave as last line of each batch file
Only if you purchased Btrieve to create your own databases, do step 9:
9. Install the Btrieve database development package (BUTIL, etc.).
Only if you have purchased the C source code for any Add-on Options from Galacticomm, do steps 10-12:
10. Put the first disk of the Add-on Option in A: and type A:INSTALL enter
11. Put the first disk of the Add-on Option C Source Code kit in A: and type: A:INSTALL enter
12. The master make file MAKEBBS.BAT and the master debugging make file MAKEBBSD.BAT are both located in the SRC directory beneath the Worldgroup server main directory (\WGSERV\SRC). Both files contain instruction pairs for each part of your project. The first line in each pair is a CD to this directory, referred to using an environment variable (%MBBS%\SRC), and the second line is the MAKE command for one of the .MAK files. The next-to-the-last line in each batch file is a CD to the %MBBS% directory (\WGSERV), and the last line is the batch label :DONE to mark the end of the file.
Insert another instruction pair in %MBBS%\SRC\MAKEBBS.BAT ahead of the last two lines of each file:
cd %MBBS%\src           <-- add verbatim for each additional *.MAK file
MAKE -fgalxyz.mak               <-- add for each additional *.MAK file, e.g. GALXYZ.MAK
cd %MBBS%                       <-- leave as next-to-the-last line of each batch file
:DONE                   <-- leave as last line of each batch file
Insert a debugging version of this same instruction pair in %MBBS%\SRC\MAKEBBSD.BAT ahead of the last two lines of each file:
cd %MBBS%\src            <-- add verbatim for each additional *.MAK file
MAKE -DDEBUG -fgalxyz.mak <-- add for each additional *.MAK file, e.g. GALXYZ.MAK
cd %MBBS%                        <-- leave as next-to-the-last line of each batch file
:DONE                    <-- leave as last line of each batch file
Instead of GALXYZ.MAK use the name of whatever .MAK file comes with the C source code of the Add-on Option. This step allows you to use MAKEBBS and MAKEBBSD to properly follow up on any and all changes you may make to the source files in the Add-on Options.
To develop your own Add-on Option, you can either use our %MBBS%\SRC directory for your source and support files, or you can make your own subdirectory.
In all cases, do one but not both of these:
13a. Put the C source code you write in %MBBS%\SRC alongside the source code we wrote. For every .MAK file you create, insert another instruction pair in MAKEBBS.BAT ahead of the last two lines of each file:
cd %MBBS%\SRC           <-- add verbatim for each additional *.MAK file
MAKE -fdddxyz.mak               <-- add for each *.MAK file you create, e.g. DDDXYZ.MAK
cd %MBBS%                       <-- leave as next-to-the-last line of each batch file
:DONE                   <-- leave as last line of each batch file
Insert a debugging version of the same instruction pair in MAKEBBSD.BAT ahead of the last two lines of each file:
cd %MBBS%\SRC            <-- add verbatim for each additional *.MAK file
MAKE -DDEBUG -fdddxyz.mak <-- add for each *.MAK file you create, e.g. DDDXYZ.MAK
cd %MBBS%                        <-- leave as next-to-the-last line of each batch file
:DONE                    <-- leave as last line of each batch file
or:
13b. Put the C source code you write in %MBBS%\DDD (substituting your own Developer-ID for DDD). For every .MAK file you create, insert another instruction pair in MAKEBBS.BAT ahead of the last two lines of each file:
cd %MBBS%\DDD           <-- add verbatim for each additional *.MAK file
MAKE -fdddxyz.mak               <-- add for each *.MAK file you create, e.g. DDDXYZ.MAK
cd %MBBS%                       <-- leave as next-to-the-last line of each batch file
:DONE                   <-- leave as last line of each batch file
Insert a debugging version of the same instruction pair in MAKEBBSD.BAT ahead of the last two lines of each file:
cd %MBBS%\DDD            <-- add verbatim for each additional *.MAK file
MAKE -DDEBUG -fdddxyz.mak <-- add for each *.MAK file you create, e.g. DDDXYZ.MAK
cd %MBBS%                        <-- leave as next-to-the-last line of each batch file
:DONE                    <-- leave as last line of each batch file
Now, test your development environment:
14. Run MAKEBBS.BAT by typing:
CD \WGSERV\SRC enter
MAKEBBS enter
This compiles and links \WGSERV\MAJORBBS.EXE, almost all \WGSERV\.DLL files, and some \WGSERV\.EXE basic utilities. The process may take many minutes depending on your computer’s processing power. Keep a sharp eye out for warnings or error messages.
15. Bring Worldgroup online and test it: transfer a file via modem, for example.
Your Worldgroup development environment is up and running!
Installation Software for Your Own Add-on Option
TPDINST.EXE is now shipped as part of the Client/Server Developer’s Kit. You are licensed to redistribute it as INSTALL.EXE in order to install your Worldgroup add-ons.
Most of the files you distribute will be combined into .ZIP compressed files on your release floppy diskette(s). The first floppy will contain INSTALL.EXE, of course, and also the file DISK1.DID. This file indicates to the installation program that it is the first in a sequence of at least one disk. The contents of DISK1.DID also convey information. For example:
2 150 7000000 NOBBSHere is what these sample entries represent:
2 total number of diskettes for this installation.
150 total number of all files inside the distribution .ZIP files on all diskettes. It is acceptable to nest existing .ZIP files into any of the distribution .ZIP files (we do this with RIPTM*.ZIP, for example), but such nested .ZIP files are counted as single files by INSTALL.EXE. Nested .ZIP files are not unzipped by INSTALL.EXE. The installation will use subdirectory information if it exists in the distribution .ZIP files, allowing you to install child directories under the destination directory.
7000000 approximate total hard disk space that will be required to complete installation, in bytes.
NOBBS Without this word, INSTALL.EXE finishes at the Introductory Menu, leaving the Sysop to either configure his new Add-on or immediately go online with a single keystroke. If the word NOBBS is present in DISK1.DID, however, the installation will finish at the DOS prompt.
Other disks must contain files named DISK2.DID, DISK3.DID, etc., but the contents of these files don’t matter. If your .ZIP files require a certain version of PKUNZIP, then put PKUNZIP.EXE on the last disk in your set (outside of any .ZIP files of course).
If the flag file WGMAN.FLG is present on the first disk, the installation program suggests \WGMAN rather than \WGSERV as the destination directory.
To run your own batch file or program after INSTALL.EXE completes, be sure to include at least one .MDF file with an Install: directive (see page 34 for details) somewhere in one of your .ZIP files.
Note: Worldgroup automatically deletes whatever file is named in an .MDF Install: directive after it’s done running.
.RLN Release Notes
You can include release notes in an .RLN file in one of your .ZIP files. INSTALL will automatically display them to the operator. We use this to display WGSMAIN.RLN to Sysops when they first install Worldgroup. That file contains very up-to-date information and it makes sure the Sysop gets a chance to read it. Note: be sure your .RLN’s lines are no more than 76 characters long.
How .MSG Files are Updated
Any .MSG files included in your .ZIP files are automatically merged with .MSG files that exist already on the Sysop’s system. This way their offline CNF option settings are preserved when they update to a new version of your software.
See page 79 for full details on creating .MSG files, but here’s an example of how it works:
Suppose you supply a DDDSAT.MSG file with an option named HOOPLA{}. If a DDDSAT.MSG file with a HOOPLA{} option already exists on the Sysop’s system, then the contents of that option (what’s between the curly braces) in the Sysop’s old DDDSAT.MSG displace those from your release disks. In all other respects (option type, description, help message), the contents of your DDDSAT.MSG file are updated on the Sysop’s system.
An alternate form of the .DID files on each of your release diskettes adds a language name at the end. For example, DISK1.DID might contain:
2 150 7000000 English/RIPThis is used in certain special situations. When a language name appears as the fourth parameter in a .DID file, it tells the INSTALL program to be sure to force all text in that language onto the receiving Worldgroup, and not to mix it with any text the Sysop may already have in that language.
This is especially helpful, for example, with English/RIP text block design and updating. There are many cases where the function of one English/RIP text block depends on the contents of another text block, and a system with a mix of old and new English/RIP versions of text blocks won’t work very well.
You can use this feature with any user language, such as Spanish/RIP or German/RIP. If you use this feature in your Add-on Option, the Sysop will be given the option (called UPDATE NEW) of mixing his text in the specified user language with yours, but he’ll be strongly encouraged to allow all of your text to take precedence (that option being called UPDATE ALL).